Did you know you can print your own drawings directly onto your pottery? It’s easier than you might think—and it’s an awesome way to add your personal touch to plates, bowls, and more! Here’s how I made a printed clay dish using an EZScreenPrint Kit and a few simple tools.
Materials You’ll Need:
-
EZScreenPrint Kit (to make the stencils)
-
Sunlight (or an exposure light)
-
Clay slab
-
Ceramic inks or thickened underglaze
-
Squeegee, rib, sponge, or brush
-
Rice paper (optional)
-
GR Pottery Form (I used the WA2 system and the 12 inch round)
-
CMC powder (if thickening underglaze)
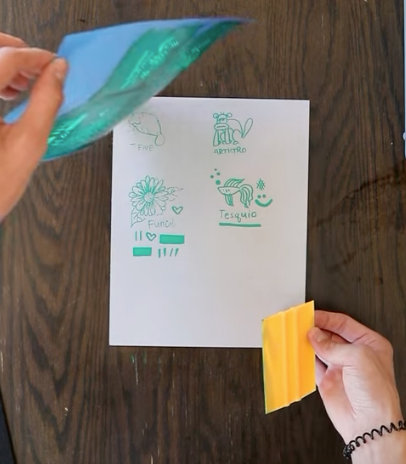
Step 1: Create Your Stencil
I started by either printing or hand-drawing my designs onto a transparency sheet. With an EZScreenPrint kit, it took me about 15 minutes to turn those designs into reusable stencils! For a more detailed tutorial on making the stencils, click here :)
All you need is a little sunlight—the kit handles everything else.
Step 2: Prepare Your Clay
I rolled out a slab of clay to a nice even thickness, prepping it to become the base for my dish.

Step 3: Mix Your Colors
Using Amaco ceramic inks, I mixed up the colors I wanted for my design.
(You can also use regular underglaze—just make sure to thicken it with a little CMC powder so it prints cleanly without bleeding.)

Step 4: Screen Print Onto the Clay
I placed my EZScreen stencil on the slab and used a squeegee to push the ceramic ink through the stencil.
(Pro tip: You can also use a sponge, rib, or brush if you prefer!)
Since I was using the same colors repeatedly, I didn’t need to rinse the stencil between prints—super convenient!


Step 5: Form the Dish
After letting the underglaze dry slightly, I laid a sheet of rice paper over the printed slab. Then I placed the slab onto a GR Pottery Form attached to my wheel head and gently compressed it into a bowl shape, adding a little foot for that perfect finishing touch.


Step 6: Let It Dry and Finish
I let the dish dry until it was just a little past leather-hard, then removed it from the form—and voilà!
A printed, personalized pottery dish ready for bisque firing.


Final Thoughts:
This method is a fantastic way to get detailed patterns and custom artwork onto the inside of plates, bowls, and dishes. The GR Pottery Forms are super easy to use and make it a breeze to add prints to the inside of slab built bowls, plates, etc.. Whether you want to make a full dinner set or just a few statement pieces, printing your own drawings opens up endless creative possibilities.
What do you guys think? Are you ready to try printing your own pottery?
]]>